

UPDATE 2/10/2024
Over the years, this post has received a lot of attention and helped a lot of people. I'm happy about that.
However, I've made a significant shift in how I approach website analytics, moving away from Google Analytics to embrace Fathom Analytics. I wanted to share my experience
Google Analytics, while powerful, is in my opinion too complex and too slow. Navigating through its endless menus to set up simple filters is frustrating, and you basically need a masterclass to make good use of it. On top of this, the privacy concerns regarding how it handles our and our visitors' data is troubling.
That's why I switched to Fathom Analytics for all my sites, personal and client's. I genuinely cannot recommend it enough. It doesn't slow down your site, it's super intuitive and usable immediately, and it respects the privacy of you and your users.
It's not free, but for $15/m you can add up to 50 websites, which is well worth the investment. The time I waste wrestling with Google Analytics is worth more than $15 a month.
If you're interested in Fathom Analytics, you can get a 30-day free trial and $10 off your first month here.

If you're not interested right now, keep scrolling to see how you can lazy-load Google Analytics to improve your Google PageSpeed rating!
---
Introduction
It's true, Google Analytics is a great tool for tracking page views and other website metrics. But when I saw that my Google PageSpeed rating was suffering because of it, I was at a loss. I scoured the internet looking for a simple, yet effective way to lazy-load Google Analytics, but all I found were overly complicated solutions that had me scratching my head. After wrestling with the problem for what felt like an eternity, I finally figured out the perfect way to lazy-load Google Analytics.
So if you're sick of your website being a tortoise, this article is for you. I'll show you how to get your site up to speed by teaching you how to lazy-load Google Analytics – and I promise it won't be as hard as you think. Let's get started!
What is Lazy-loading?
Lazy-loading is a way of making your website faster by only loading certain pieces of content when they are needed. It’s a great way to reduce the amount of time your site takes to load, and can be especially useful when it comes to loading Google Analytics. By lazy-loading Google Analytics, you can ensure that your tracking code is only loaded when a visitor interacts with your website. This can help you improve your website’s performance, and make your visitors’ experience that much smoother.
Benefits of Lazy-loading
When you lazy-load Google Analytics, you can reap a variety of benefits.
Not only will your website load faster, but you’ll also be able to track more accurate data since only visitors who actually interact with your website will be counted.
Additionally, lazy-loading Google Analytics can help reduce the amount of bandwidth used, which can be especially helpful if you’re on a limited data plan.
Finally, lazy-loading Google analytics helps to get better PageSpeed scores, which is important for SEO, as Google prefers to rank well-performing websites.
How It Works
The way we will lazy-load Google Analytics is by waiting for the user to scroll the page before loading the Google Analytics tracking code. This means that visitors who simply load the page and don’t scroll won’t trigger the Google Analytics tracking code. You’ll need to decide whether or not you’re okay with this trade-off for the performance boost. For my use case, I wasn’t too concerned about tracking those visitors who simply loaded the page and immediately bounced. I only wanted to get data from those who were truly interacting with my website, so this trade-off worked for me.
Step by Step Guide to Lazy-Loading Google Analytics
It all starts with the snippet provided to you when you set up your account. You’re instructed to put it below the closing </head> tag of your website’s source code. It has two <script> blocks of code and it looks something like this:
1<!-- 1 -->2<script async src="https://www.googletagmanager.com/gtag/js?id=G-XXXXXXXXXX"></script>3<!-- 2 -->4<script>5 window.dataLayer = window.dataLayer || [];6 function gtag(){dataLayer.push(arguments);}7 gtag('js', new Date());8 gtag('config', 'G-XXXXXXXXXX');9</script>
Step 1
Move the second <script> tag block just before the closing </body> tag, instead of placing it above the closing </head> tag.
Example:
1<!DOCTYPE html>2<html>3 <head>4 <title>Page Title</title>5 <meta charset="utf-8" />6 </head>7 <body>8 <h1>This is a Heading</h1>9 <p>This is a paragraph.</p>10 <!-- Place it here -->11 <script>12 window.dataLayer = window.dataLayer || [];13 function gtag(){dataLayer.push(arguments);}14 gtag('js', new Date());15 gtag('config', 'G-XXXXXXXXXX'); // Replace 'G-XXXXXXXXXX' with your Analytics ID16 </script>17 </body>18</html>
Step 2
Place this block above the previous one:
1<!-- Google Analytics load on scroll -->2<script>3 function analyticsOnScroll() {4 var head = document.getElementsByTagName('head')[0]5 var script = document.createElement('script')6 script.type = 'text/javascript';7 script.src = 'https://www.googletagmanager.com/gtag/js?id=G-XXXXXXXXXX'8 head.appendChild(script);9 document.removeEventListener('scroll', analyticsOnScroll);10 };11 document.addEventListener('scroll', analyticsOnScroll);12</script>
This will load the the first of the two <script> tag block above the <head> tag only after it detects the user scrolling.
That’s it! In the end, your code should look something like this:
1<!DOCTYPE html>2<html>3 <head>4 <title>Page Title</title>5 <meta charset="utf-8" />6 </head>7 <body>8 <h1>This is a Heading</h1>9 <p>This is a paragraph.</p>10 <!-- Google Analytics load on scroll -->11 <script>12 function analyticsOnScroll() {13 var head = document.getElementsByTagName('head')[0]14 var script = document.createElement('script')15 script.type = 'text/javascript';16 script.src = 'https://www.googletagmanager.com/gtag/js?id=G-XXXXXXXXXX'17 head.appendChild(script);18 document.removeEventListener('scroll', analyticsOnScroll);19 };20 document.addEventListener('scroll', analyticsOnScroll);21 </script>2223 <!-- Google tag (gtag.js) -->24 <script>25 window.dataLayer = window.dataLayer || [];26 function gtag(){dataLayer.push(arguments);}27 gtag('js', new Date());28 gtag('config', 'G-XXXXXXXXXX');29 </script>30 </body>31</html>
Results
Using the traditional way of loading Google Analytics, my site gets an 81/100 on pagespeed.web.dev
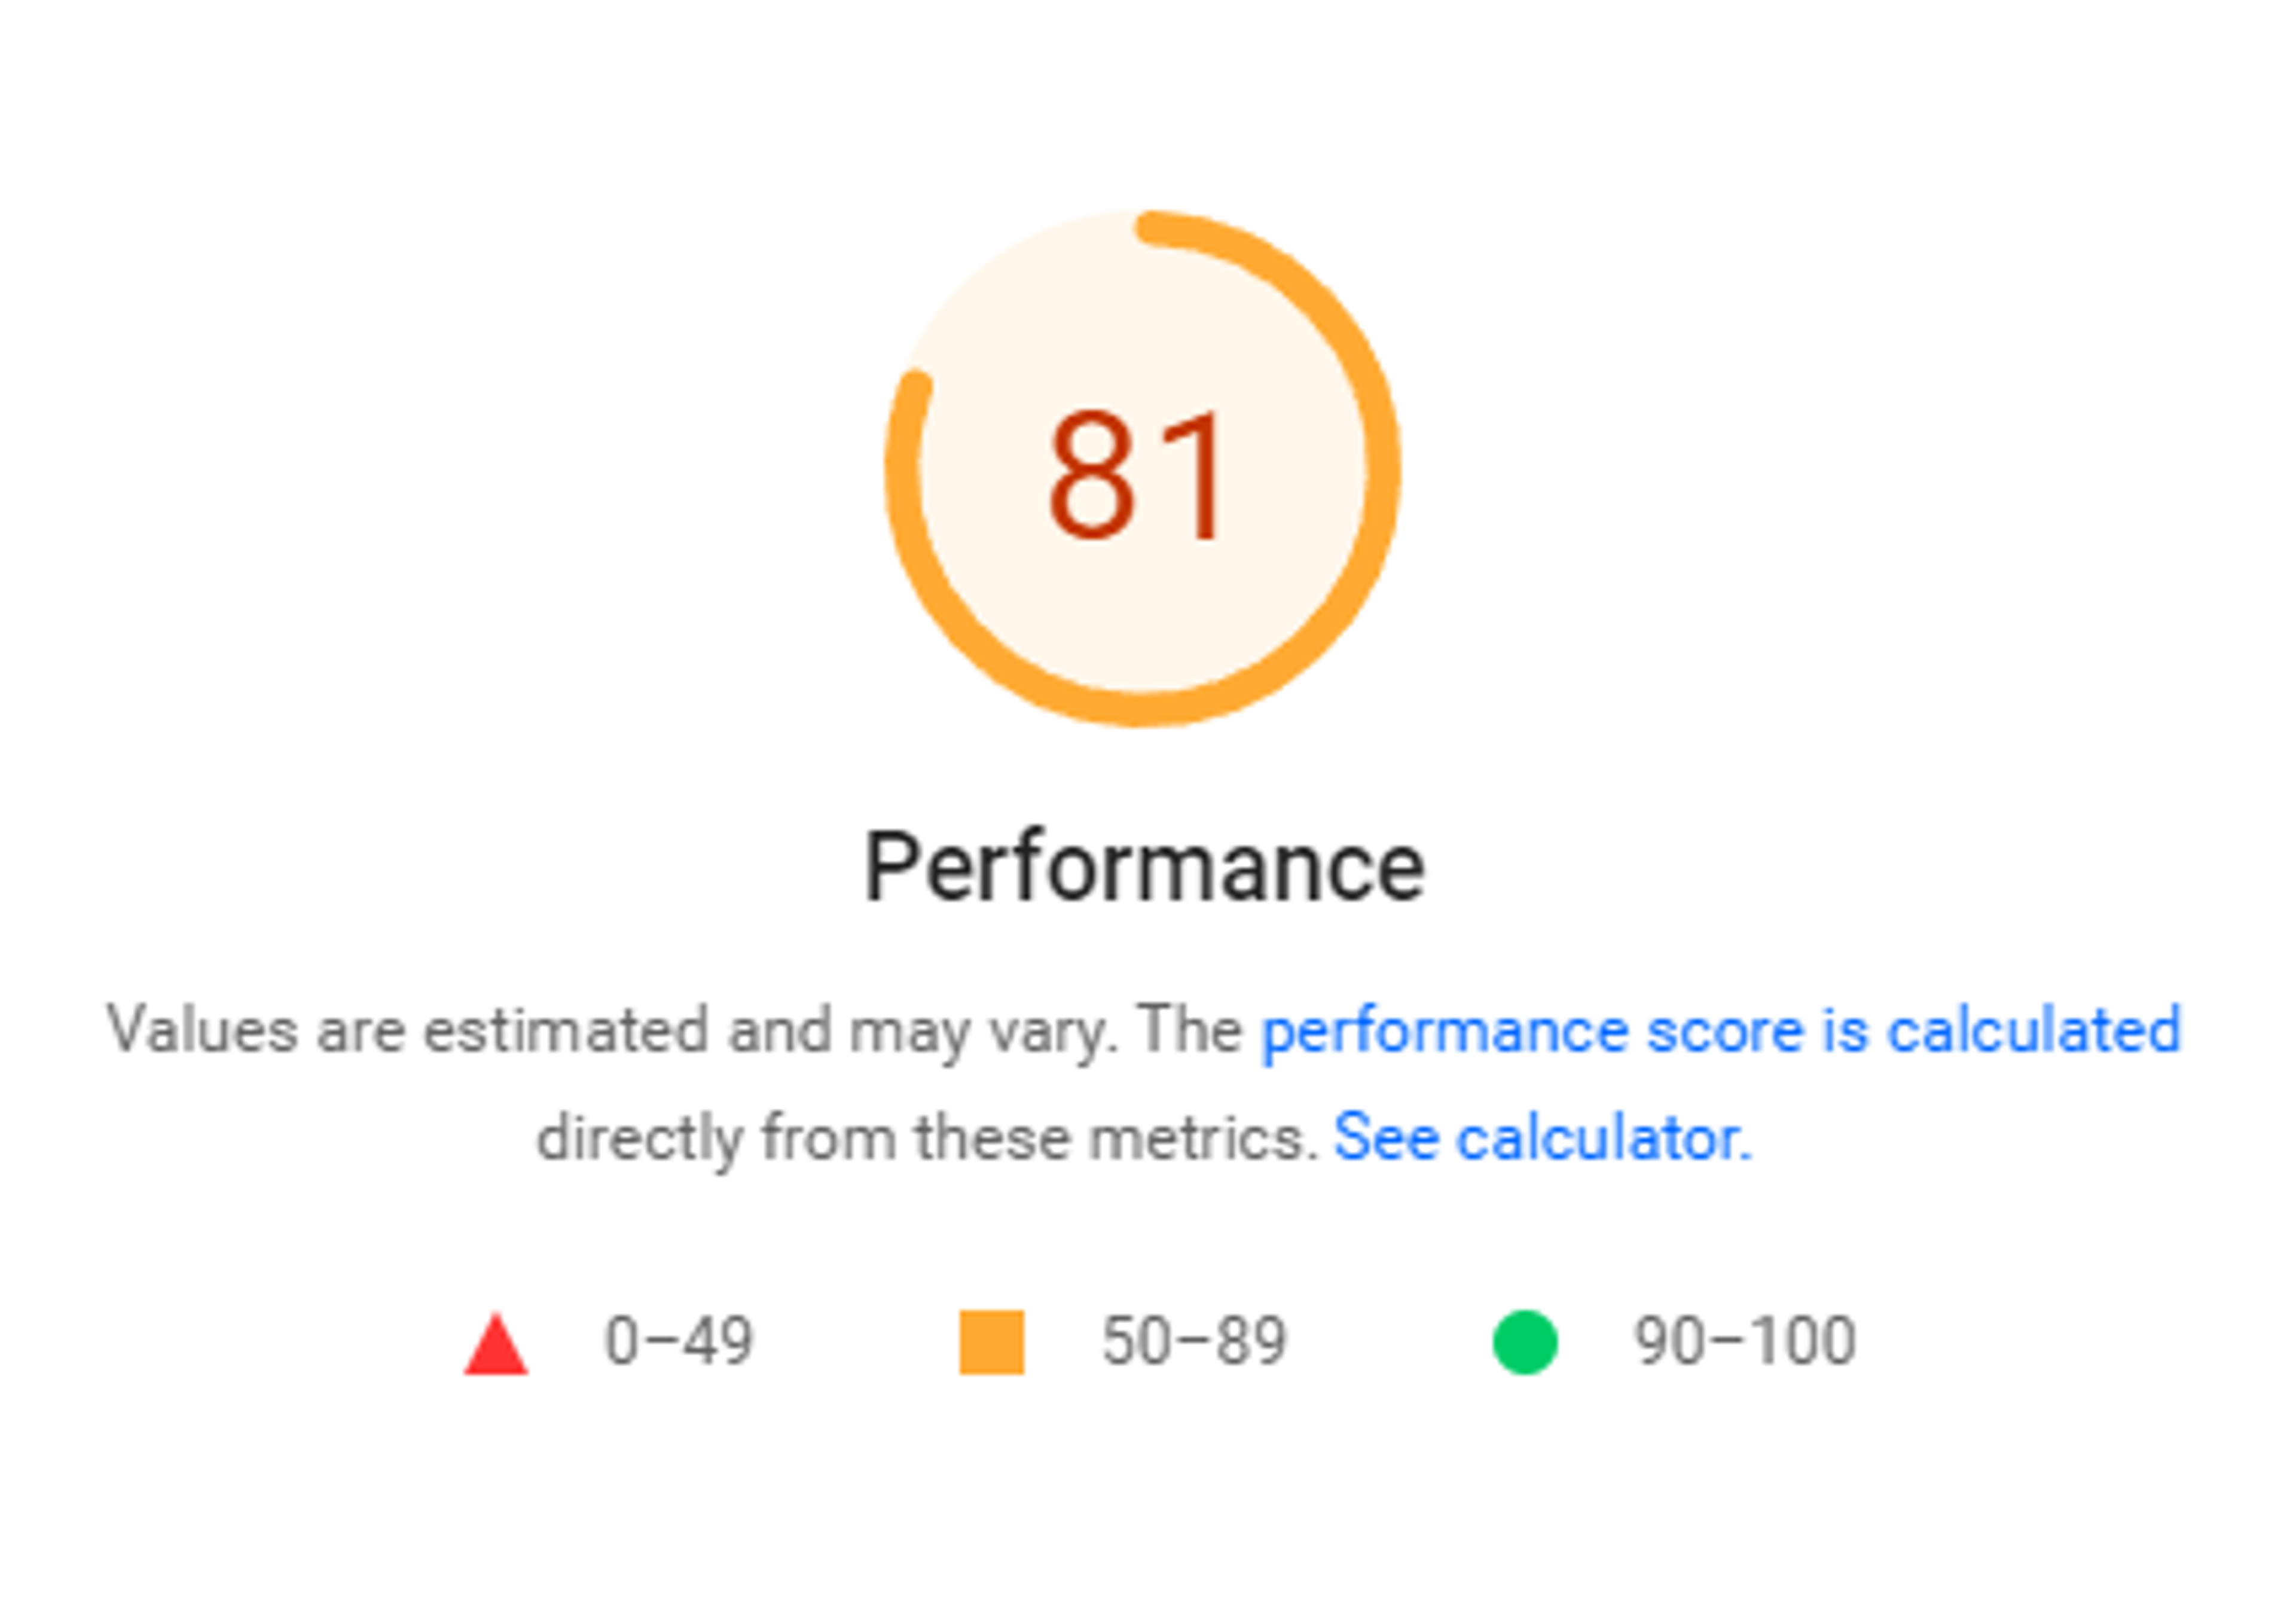
That’s pretty good, and there’s a lot more to getting a good page speed than lazy-loading Google Analytics. But let’s see what my score is after implementing the method laid out in this article:
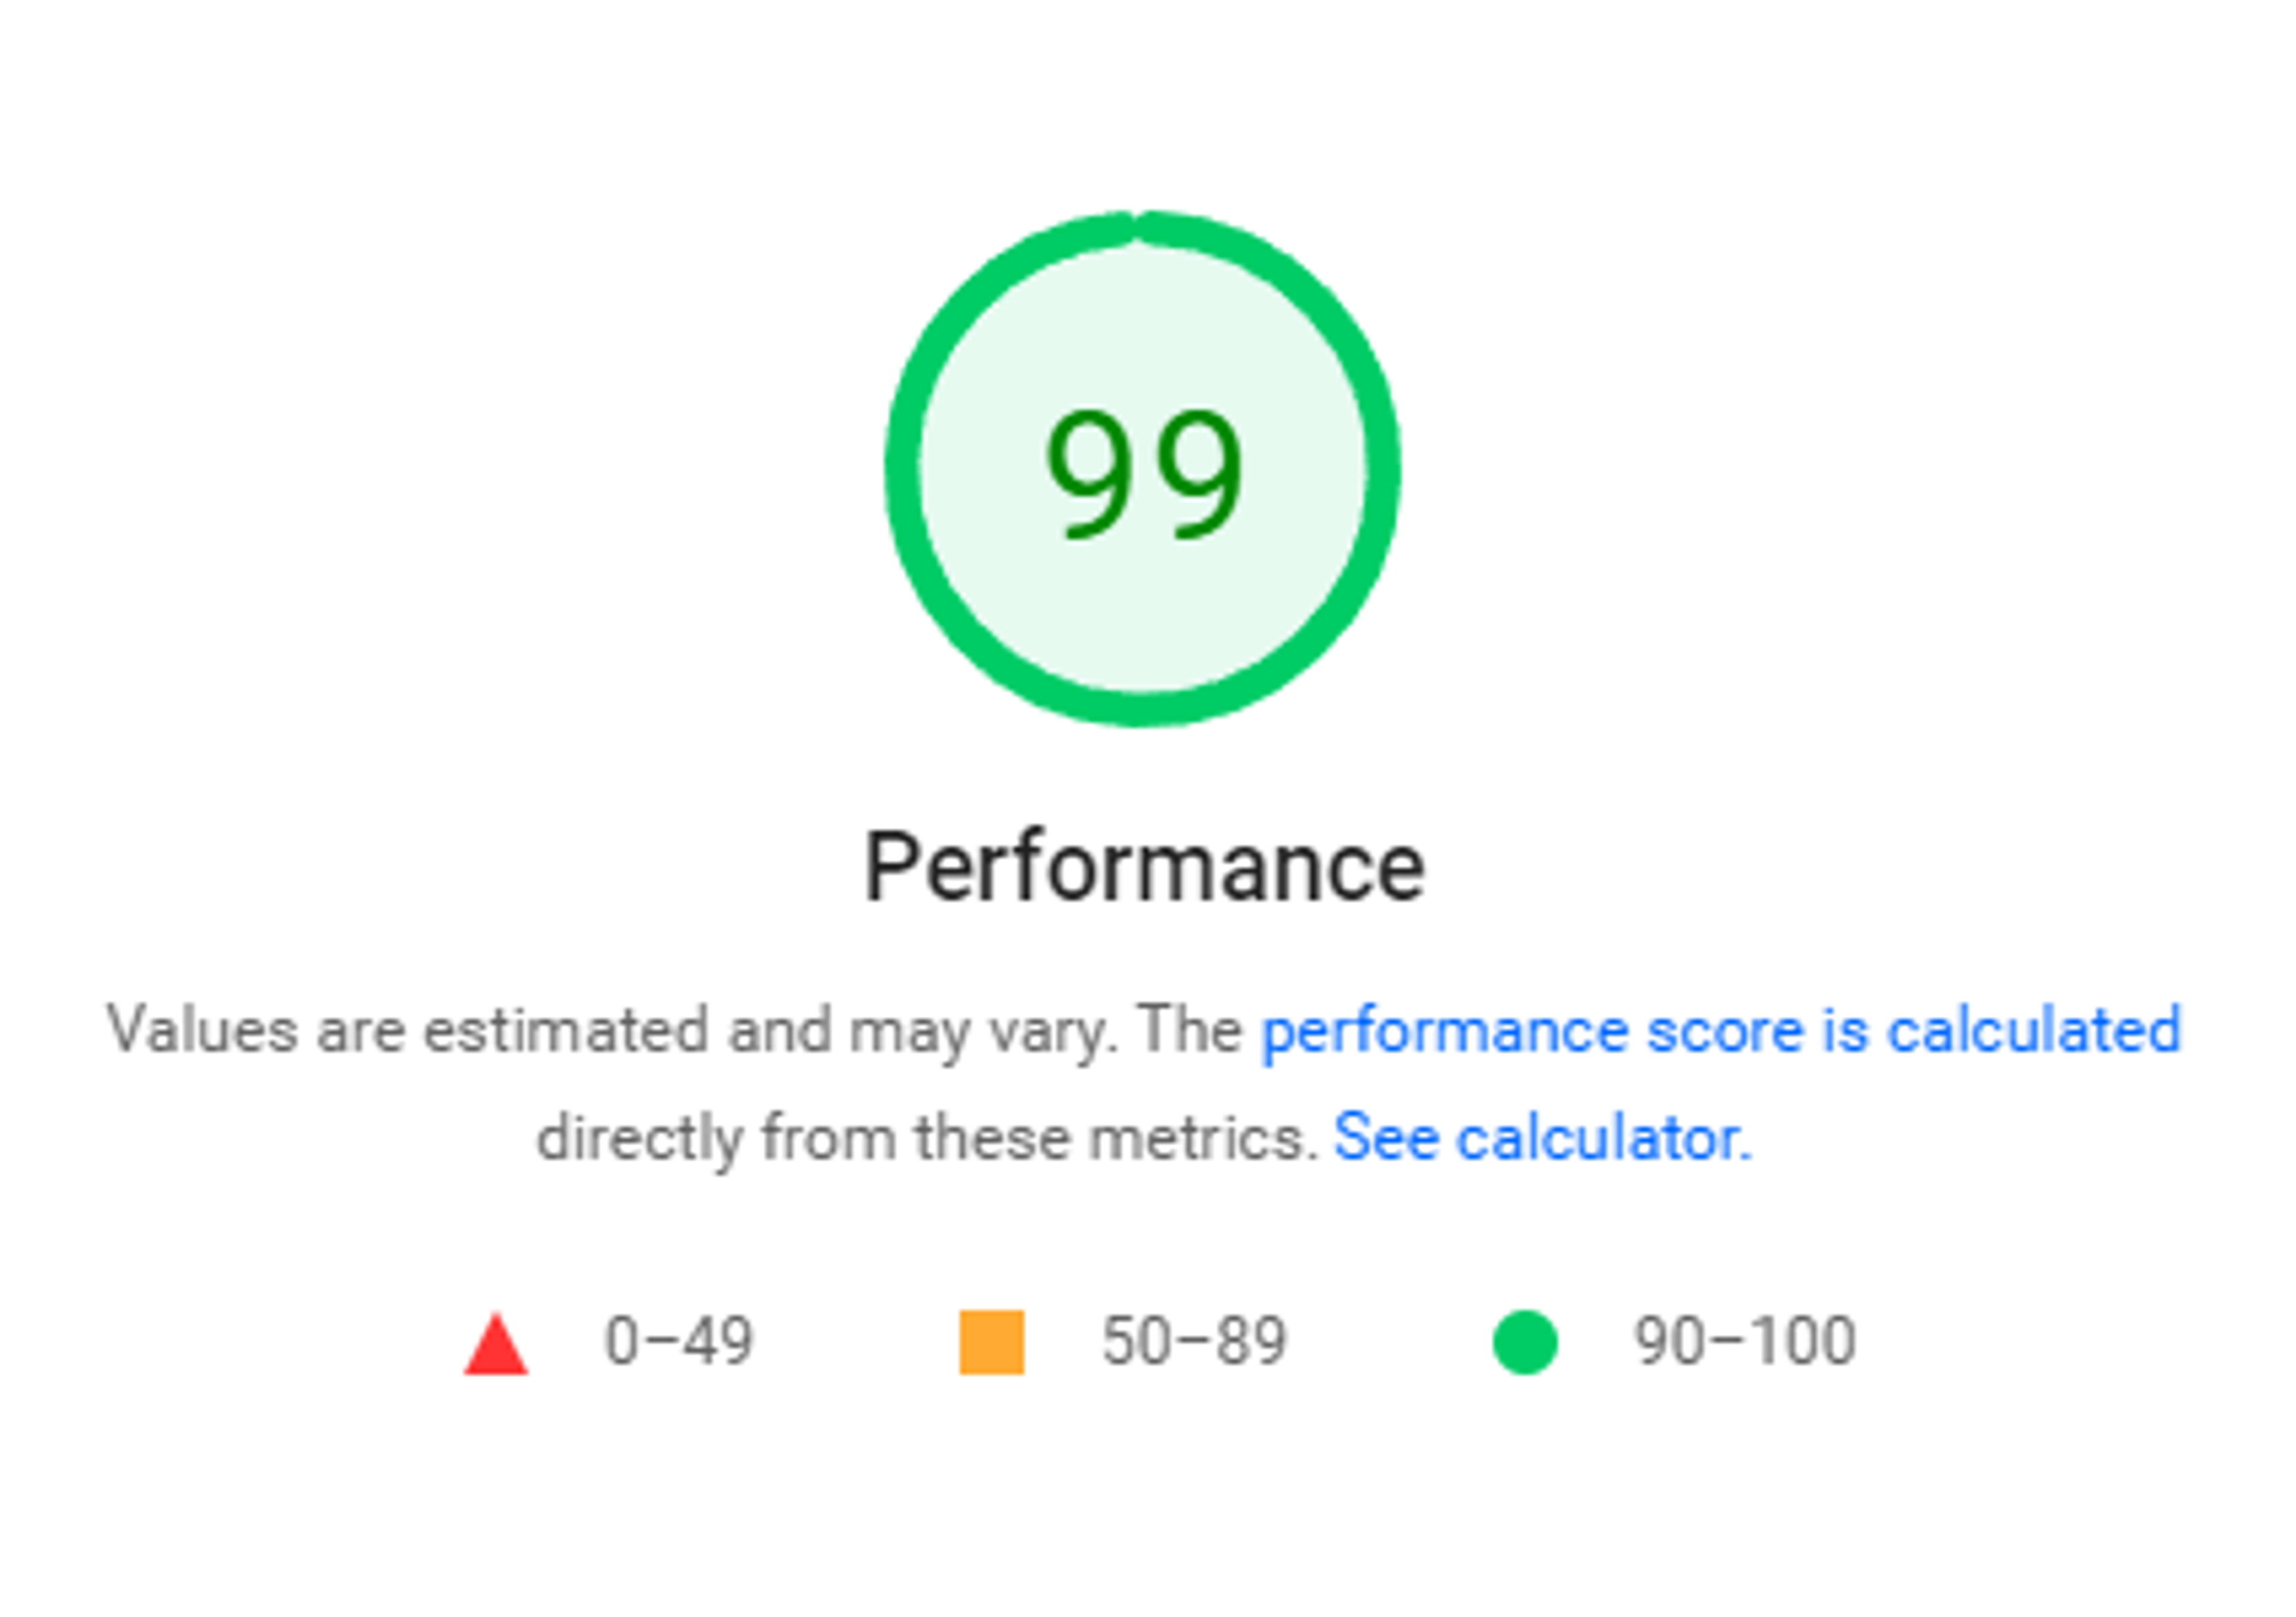
99/100! That’s a 18% improvement.
If you’re skeptical, you can test my website’s page speed yourself by clicking here: pagespeed.web.dev/report?url=michaelmannucci.com
Conclusion
In conclusion, if you need to use Google Analytics, lazy-loading it can be a great way to improve your website’s performance by only loading the tracking code when it’s actually needed. All it takes is a few lines of code, and you’ll be able to enjoy a faster, more efficient website that tracks the right data. So if you’re looking to get your site up to speed, consider lazy-loading Google Analytics – you won’t regret it.
But there's more to PageSpeed than the analytics you use. At my web design company, Webbolt, all of our client's sites get over 90% and usually over 95%!
We believe design on its own is cheap. What's really valuable is a website that get results. We work work small to medium size businesses, focusing on turning visitors into customers, so business owners can see a return on their investment.
Check out Webbolt to see how we can make your website work harder for you.